Indulge in these tastefully spooky drinks and candy this Halloween!
 Bane’s Bloody Mercy
A bloody drink is only fitting for Bane’s destruction
- 1 ½ parts Portón
- 4 parts Tomato Juice
- 2 tsp Horseradish
- ½ part Worcestershire Sauce
- 2 dashes of Hot Sauce
- Squeeze Lemon
- Squeeze Lime
- Salt and Pepper
Method: Combine ingredients in a Collins glass with ice, and stir. Do not shake. Garnish as desired.
 Gangnam Style Pony-rita
Inspired by the bright, sassy suits and dance moves
- 2 ½ parts Tequila Avión Silver
- ½ part lime juice
- ½ part fresh lime juice
- Sugar for rim
- Lime slice garnish
Method: Fill blender with ice and wet ingredients. Blend until frozen. Rub the rim of a margarita glass with a lime slice so that the sugar will stick, then rim the glass with sugar and add blended ingredients. Garnish with a lime slice.

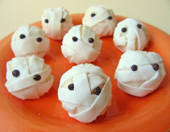
Mummy Truffles
- 4 ounces cream cheese, softened to room temperature
- 1 tsp vanilla extract
- 1/2 tsp coconut extract
- 3 cups powdered sugar
- 1 cup shredded coconut
- 1/8 tsp salt
- 8 ounces white fondant
- 2 tbsp chocolate chips
Preparation:
1. Place the cream cheese,vanilla, and coconut extract in the bowl of a large electric mixer. Mix them on medium speed until the cream cheese is smooth and entirely soft.
2. Stop the mixer, add 2 cups of powdered sugar, and mix on low speed until the powdered sugar is incorporated. Stop the mixer and add the remaining powdered sugar and mix just until combined.
3. Scrape down the sides and bottom of the bowl and add the coconut and salt. Turn the mixer to low and mix until the candy is homogenous and well-mixed. Check the texture of the candy: you want it to be firm enough to easily be shaped into a ball, but not too dry and stiff. If necessary, add more powdered sugar to get the right texture.
4. Using a spoon, scoop up a small amount of candy and roll it between your hands until it is round. Place the ball on a foil-lined baking sheet and repeat with remaining candy. Chill until the balls are firm, about 2 hours.
5. Once the balls are firm, roll the fondant out on a powdered sugar-dusted workstation until it is a thin rectangle about a foot long. Roll the fondant as thin as possible, because you don’t want the fondant layer to overwhelm the candy. Use a pizza cutter or sharp knife to cut very thin strips of fondant, about 1/8-1/4 inch thick. At this point, you can use a rolling pin to roll the individual strip of fondant even thinner to get a paper-thin strip.
6. Take one thin strip and wrap it around one of the coconut balls, criss-crossing it in the front to make the mummy’s bandages. If it breaks, just start wrapping again–it doesn’t have to be perfect. You can use a little water or corn syrup to get it to stick to the coconut ball if it has trouble sticking. Wrap it around 3-4 times total–it is okay if some of the coconut is showing through. Repeat with remaining fondant and coconut balls, re-rolling the fondant scraps as necessary until all of the balls are covered with mummy bandages.
7. Melt the chocolate chips and use a toothpick to dot the chocolate onto the mummies to form eyes. Alternately, you can stick on mini chocolate chips or M&Ms for the eyes.
8. Store Mummy Truffles in an airtight container in the refrigerator for up to a week. Yield: about 24 1-inch candies

Chocolate-Filled Witch Hats
- 3.5 oz semi-sweet chocolate (about 1/2 cup chopped)
- 1/3 cup heavy cream
- 12 pointy-tipped ice cream cones
- 12 thin, round cookies
- 12 oz (about 2 cups) chocolate candy coating wafers
- 1 fruit roll-up (optional)
Preparation:
1. Finely chop the semi-sweet chocolate and place it in a small bowl. Put the cream in a small saucepan over medium-high heat and bring it to a simmer, but do not allow it to boil.
2. Pour the hot cream over the chopped chocolate and gently whisk it until the chocolate melts and the mixture becomes smooth and homogenous. This is your “ganache.” Press some cling wrap directly on top of the ganache, and place it in the refrigerator until it is firm enough to pipe, about 1 hour.
3. Once your ganache is a spoonable texture (but not too firm, or it will be hard to work with), remove it from the refrigerator and place it in a piping bag fitted with a ½ inch round tip, or if you don’t have this, into a large Ziploc bag with a ½ inch hole cut in the corner.
4. Use a sharp serrated knife to cut the ice cream cones about 2 inches from the bottom, creating small mini-cones about 2.5 inches long. Try to get them fairly even, but don’t worry if they’re not perfectly straight.
5. Insert the tip of the piping bag in a cone and squeeze until it is filled with ganache. Overfill it slightly, so that there is extra ganache coming out from the top. Center the ganache-filled cone onto a round cookie. The extra ganache will help “glue” the cone to the cookie. Repeat with remaining ganache and cones. Place the 12 witch hats on a baking sheet and refrigerate them until the ganache is firm, about 1 hour more.
6. Place the candy coating in a microwave-safe bowl and microwave until melted, stirring after every 30 seconds to prevent overheating.
7. Once the coating is melted and smooth, dip the witch hats completely in the coating, using forks or dipping tools. Tap the fork against the side of the bowl to encourage excess coating to drip back down, and scrape the bottom of the cookie against the lip of the bowl to remove excess coating. Place the dipped hat back on the baking sheet and repeat with remaining witch hat candies.
8. If you would like to add ribbons to your hats, unwrap the fruit roll-up and use a pizza cutter or sharp knife to cut twelve thin strips from the roll-up. Wrap a strip around each hat. You can either trip off the extra, or cross it into a decorative ribbon or bow.
9. Refrigerate the hats to set the coating, about 10 minutes. Chocolate-Filled Witch Hats can be stored in an airtight container in the refrigerator for several days, but their taste and texture is best the day they are made.
